______________________________________________________________________
The preloader is needed for making a game only if you want people to play your game on the internet. What it does? It will actually be like…"Hey, wait here to load your game first before you play it". What if you don’t have a preloader? Then you will load and play the game at the same time making a non-smooth game playing(lag in the game).
The preloader can actually be created after you finish making your whole game. If you just want to make a game to play by yourself in your computer, you don’t need a preloader at all.
Anyways, let's see how to make one.
Figure 2.1
First, open a new file. At the first frame, draw a bar as shown below.
Figure 2.2
Select the bar and press F8 or choose Modify –> Convert to Symbol.


Figure 2.3: Select the Type to be Movie clip
Put any name you like(for this case we can say “Loader”). Select the Type to be Movie clip.Then, double click it(the bar you just created). Now you are inside your bar time line.
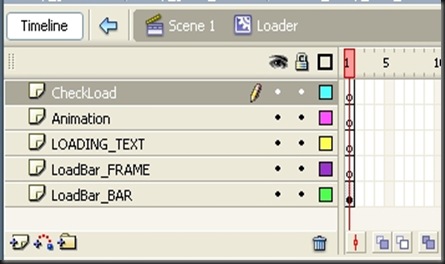
Add 4 more layers. Now there are 5 layers as shown in Figure 2.5.
Figure 2.5
Change the names of each layer as following;Layer 1 –> LoadBar_BAR
Layer 2 –> LoadBar_FRAME
Layer 3 –> LOADING_TEXT
Layer 4 –> Animation
Layer 5 –> CheckLoad
(see Figure 2.6)
Figure 2.6
OK. We will go through layer by layer. Let’s see the first layer, LoadBar_Bar. Click at your white bar and press F8.Name it as “LoadBar”. Make sure you set the Type to be “Movie clip”. (See Figure 2.7)
Figure 2.7
Press OK.Next step, you have to set this bar an instance name. Click to select your bar again(if you haven’t selected it). Now, look at the properties tab(if you cannot see your properties tab, just press Ctrl and F3 together or go to Window –> Properties –> Properties as seen in Figure 2.8).
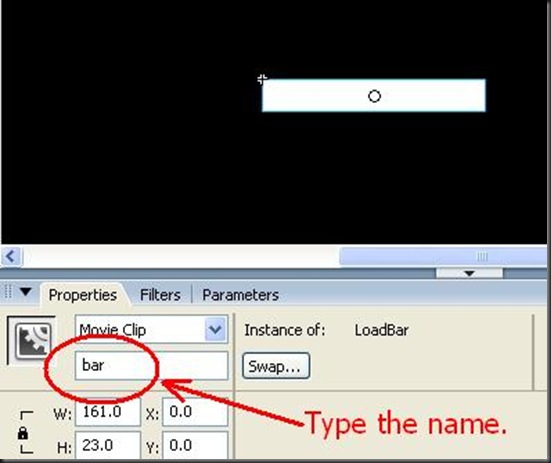
Now that your properties tab pops up, you can put an instance name in there. Let say “bar”.(see Figure 2.9)
If your bar is being selected, you can see a small circle in the middle of it(Figure 2.10). That is the center point of the bar. We need to make this center point to be on the left of the bar so that when our game is loading, the bar is extending from left to right.
To move this center point, you need to use the “Free Transform Tool” or you can press Q for shortcut(see Figure2.11).
Then just click at the small circle in the middle of the white bar and hold it. Drag it to the left side of the bar as seen in Figure 2.12.
We are done with this layer now.
Next we will go for the “LoadBar_FRAME” layer. We need to draw a frame for our bar but first make our bar in “LoadBar_BAR” layer to be seen as an outline. How to do it? Just click the outline icon as seen in Figure 2.13 below.
Then select “LoadBar_FRAME” layer and draw a rectangle to fit your outline bar. (see Figure 2.14)
Before you draw this rectangle, make sure that you set the properties of the rectangle tool right as in Figure 2.15.
Figure 2.15
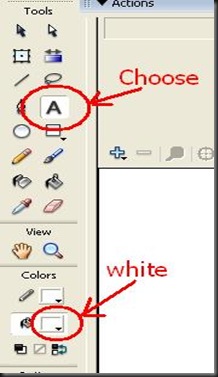
For this case, white outline stroke color with no fill color.That’s it for “LoadBar_FRAME” layer.
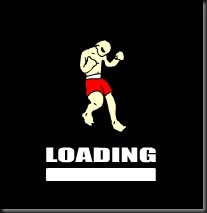
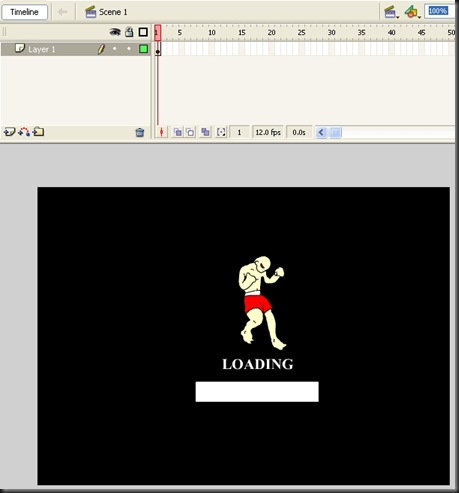
Next layer is “LOADING_TEXT”. Just add a text in this layer. We can say “LOADING” as seen in Figure 2.16.
 |
Figure 2.16
The next layer is “Animation” layer. You can actually put any animated clip here but, for this case, I put my main character walking animation.(see Figure 2.17)Figure 2.17
This animated clip is just a movie clip that I created. Let’s look inside of this movie clip. I will just double click it to see what is inside.As seen in Figure 2.18, there are 4 frames. Each frame contains a picture of walking poses.
Figure 2.18
Basically, if you are making your game, you can find any sprites or draw them by yourself and put them in this part. That’s it for the “Animation” layer.Here comes the last layer, “CheckLoad”. In this layer, we have to put some code in the frames. Click at the first frame of “CheckLoad” layer and press F9 or go to Window –> Actions to open the Actions panel as seen in Figure 2.19 below.
Figure 2.20
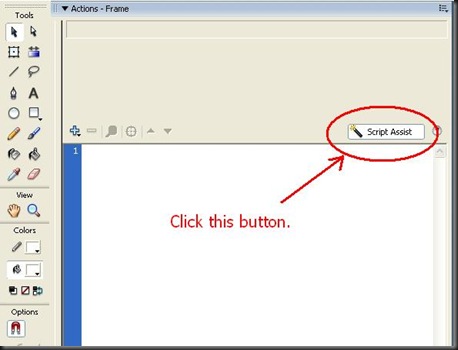
Then you will see the Action panel. Click at the “Script Assist” button as shown in Figure 2.21.Now, copy the following code and put it in the Action script panel. (see Figure 2.22)
_root.stop();
PercentLoaded = _root.getBytesLoaded() / _root.getBytesTotal() * 100;
if (PercentLoaded != 100) {
setProperty(bar, _xscale, PercentLoaded);
} else {
gotoAndStop("loaded");
}
PercentLoaded = _root.getBytesLoaded() / _root.getBytesTotal() * 100;
if (PercentLoaded != 100) {
setProperty(bar, _xscale, PercentLoaded);
} else {
gotoAndStop("loaded");
}
What is this code doing? It will compute the percent of your total flash movie capacity(in bytes) and show the percentage on the length of your bar(remember the white bar we created?).
Now, click at the 2nd frame on the “CheckLoad” layer and put in the following code. (see Figure 2.23)
gotoAndPlay(1);
Add more frames on each layer as shown in Figure 2.24 below.
To add a frame, press F5.
To add a keyframe, press F6.
To add a blank keyframe, press F7.
Now, in “LOADING_TEXT” layer(actually you can do this in any layer but I will just show you in this layer), at frame 3, you must add a button here. You can use a button from the “Common Libraries”, Figure 2.25, or you can create your own.
Window —> Common Libraries –> Buttons
Figure 2.25
For this blog, I use my the button as shown in Figure 2.26.If I double click at the button, we will see what inside the button as shown in Figure 2.27.
Layers
BG = The background of button.
Text = Text of the button. In this case, we use the word “PLAY”
Sound = The sound used when button is pressed.
Keyframe States
Up = When mouse cursor is not in the area of button.
Over = When mouse cursor is on the button but not pressed.
Down = When button is pressed.
Hit = It defines the area of the button that responds when clicked.
OK. Now we need to add some code in this button. Select the button first. Then add the following codes as we can see from Figure 2.28.
on (release) {
_root.play();
}
_root.play();
}
Almost done! Click at frame 3 of “LOADING_TEXT” layer and look for the properties tab. Put the frame label as “loaded”.(see Figure 2.29)











No comments:
Post a Comment