Testing your character movement (Part 4)

September 30, 2011
____________________________________________________________________

How to make the main character move?

If you take a look at Figure 10.1, you will see that you have a movie clip of you main character in scene 1. Left click at it once and open the actions script(by pressing F9 or choose Window --> Actions).

 
Figure 10.1

Put the code as show below and I will explain next.

onClipEvent (enterFrame) {
    this._x = /:move_x;
    this._y = /:move_y;
        if (Key.isDown(Key.RIGHT)) {
            this._xscale = 100;
            /:face = "right";
            /:status = "walk";
            /:move_x = /:move_x+10;
        } else if (Key.isDown(Key.LEFT)) {
            this._xscale = -100;
            /:face = "left";
            /:status = "walk";
            /:move_x = /:move_x-10;
        }
}

You can use the script Assist as shown in Figure 10.2.


Figure 10.2

onClipEvent (enterFrame) {

    This will perform actions when a particular movie clip event occurs. As you can see in the parenthesis "(enterFrame)", the "enterFrame" in the parenthesis is called "event". Whenever the timeline enters this frame, the code will be activated. There are many more events such as "Load', "Unload", "Mouse down", "Mouse up", ect. which I will not talk about them in details here.
_____________________________________________________________________

this._x = /:move_x;
this._y = /:move_y;

     These two lines are the position properties of your main character movie clip.

this._x means the value of the x position.
this._y means the value of the y position.

I set tthe first one (this._x) to be equal to my variable "/:move_x" which I declared this value at the first frame of the scene. Same thing for "this._y".

Let's just say that at the first frame, I set /:move_x = 200 and /:move_y = 100.


Figure 10.3

Then when the game runs. The position of the main character will be at x = 200, y = 100.

___________________________________________________________________

if (Key.isDown(Key.RIGHT)) {

   This command will detect what you do with the keyboard. If you press the right arrow key down, this code will be active.
___________________________________________________________________

this._xscale = 100;

   This line means the scale of you x direction is 100 % (the original x width scale).

___________________________________________________________________

/:face = "right";
/:status = "walk";


   These two lines are nothing but to set the variables(that you make it up) for the states of the main character that will be used for other actions. Like it said, /:face = "right" is just to make the value of /:face to be "right". And /:status = "walk", intuitively, is the value of /:status saying that now it's on the "walk" state.

____________________________________________________________________

/:move_x = /:move_x+10;

   The value of /:move_x is increasing by 10. This makes the main character move to the right by 10 pixels.

_____________________________________________________________________

if (Key.isDown(Key.LEFT)) {

   If you press the left arrow key down on your keyboard, this code will be active.
___________________________________________________________________

this._xscale = -100;

   This line means the scale of you x direction is 100 % (the original x width scale) but the minus sign makes it flip vertically, i.e. the character will be flipped to the other side.

___________________________________________________________________

/:face = "left";

   Like it said, /:face = "left" is just to make the value of /:face to be "left".
____________________________________________________________________

/:move_x = /:move_x - 10;


   The value of /:move_x is decreasing by 10. This makes the main character move to the left by 10 pixels.

_____________________________________________________________________

Yeah, now you can test your character movement (left and right only). I hope you are getting some idea how to control it. Good luck ;)


Testing your character movement (Part 3)

September 14, 2011
___________________________________________________________________

OK. Continue with the topic. In part 2, I talked about the action script for standing. This part, I will talk about walking action script. As you can see below,Figure 9.1, The action script is on the "command" layer at frame 10.

Figure 9.1

The script is as the following.

Line  1: ../:duck = "on";
Line  2: ../:block = "on";
Line  3: ../:kick_01 = "on";
Line  4: ../:punch_01 = "on";
Line  5: if (../:walking == "on") {
Line  6:     play();
Line  7: } else if (../:walking == "off" or ../:status == "stand") {
Line  8:     gotoAndPlay(1);
Line  9: }
Line10: if (../:status == "death") {
Line11:      gotoAndPlay("death");
Line12:  } else if (../:status == "hurt_01") {
Line13:      gotoAndPlay("hurt_01");
Line14:  } else if (../:status == "hurt_02") {
Line15:      gotoAndPlay("hurt_02");
Line16:  } else if (../:status == "punch_01") {
Line17:      gotoAndPlay("punch_01");
Line18:  } else if (../:status == "kick_01") {
Line19:      gotoAndPlay("kick_01");
Line20:  } else if (../:status == "duck") {
Line21:      gotoAndPlay("duck");
Line22:  } else if (../:status == "block") {
Line23:      gotoAndPlay("block");
Line24:  }
(See Figure 9.2)
 
Figure 9.2

Again, I will explain most of the script here.
___________________________________________________________________

../:duck = "on";
 
This value is to indicate the permission for my main character to duck from this state("walking"). "On" means he can duck from this state.
___________________________________________________________________
 
../:block = "on";
../:kick_01 = "on";
../:punch_01 = "on";
 
Well, these 3 lines are the same as the first line. The values are for the permission of each movement I set for. "on" means it is ok to make that move from this "stand" state, i.e., he can block, kick_01, and punch_01 from walking state.
___________________________________________________________________
 
if (../:walking == "on") {
    play();
} else if (../:walking == "off" or ../:status == "stand") {
    gotoAndPlay(1);
}

  This means if the value of parameter "walking" is "on", then just keep playing on the timeline. On the other hand, if the parameter "walking" is "off" or the parameter "status" is set to be "stand", just go back and play at frame 1(which is the the frame label "stand").
___________________________________________________________________

if (../:status == "death") {
    gotoAndPlay("death");
} else if (../:status == "hurt_01") {
    gotoAndPlay("hurt_01");
} else if (../:status == "hurt_02") {
    gotoAndPlay("hurt_02");
} else if (../:status == "punch_01") {
    gotoAndPlay("punch_01");
} else if (../:status == "kick_01") {
    gotoAndPlay("kick_01");
} else if (../:status == "duck") {
    gotoAndPlay("duck");
} else if (../:status == "block") {
    gotoAndPlay("block");
}

These lines just show that fi the value of "status" equals what it indicates, go to the frame label correspondingly.
____________________________________________________________________

Now, I want to show you that this action script will be used in frame 11 - 13 as well(see Figure 9.3).

Figure 9.3

You can right click at the action script frame you want to copy and then choose "Copy Frames" or you can press Ctrl+Alt+C. Then you paste them by right clicking the frame you want to paste and choose "Paste Frames" or you can press Ctrl+Alt+v.

The last frame on this state(walk) that has an action script on frame 14 will have a little bit different action script as seen below.

../:duck = "on";
../:block = "on";
../:kick_01 = "on";
../:punch_01 = "on";
if (../:walking == "on") {
    gotoAndPlay("walk");
} else if (../:walking == "off" or ../:status == "stand") {
    gotoAndPlay(1);
}
if (../:status == "death") {
    gotoAndPlay("death");
} else if (../:status == "hurt_01") {
    gotoAndPlay("hurt_01");
} else if (../:status == "hurt_02") {
    gotoAndPlay("hurt_02");
} else if (../:status == "punch_01") {
    gotoAndPlay("punch_01");
} else if (../:status == "kick_01") {
    gotoAndPlay("kick_01");
} else if (../:status == "duck") {
    gotoAndPlay("duck");
} else if (../:status == "block") {
    gotoAndPlay("block");
}
(See Figure 9.4)
  

Figure 9.4

The only different is at line 5.

if (../:walking == "on") {
    gotoAndPlay("walk");

This means that if the parameter "walking" is "on", then go back and play at frame label "walk". This is how we loop the walk movement.

That's it for this part. I think you get the idea for the rest of the movement. On the next part, I will explain how to make your main character controllable ;)

Testing your character movement (Part 2)

September 13, 2011
___________________________________________________________________

Let's take a look at Figure 8.1. The action script from "command" layer at frame 15 is as the following;

if (/:breath == "off") {                  // This means that if the value of breath = off
    gotoAndPlay("over");                // Then go to and play at frame label "over"
} else if (/:breath == "on") {         // On the other hand, if the value breath = on
    gotoAndPlay("gameon");           // Go to and play at frame label "gameon"
}


Figure 8.1

That is how we loop the game. The game will be playing from frame 5, 6, 7,... to frame 15 and then back to frame 5, 6, 7, 8,... again and again until something happens(that means when the value of breath = off).

At frame 20, in "command" layer, there is an action script that says...

gotoAndPlay("over");       // Go to and play at frame label "over"

Figure 8.2

As we can see in Figure 8.2, this is how you loop when game is over.

OK, now that we have set up the game system for testing the movement of this character, let see how we are going to do next.
If I double click this character(this character is a movie clip), I will be inside as in figure 8.3. Look at the top layer that says "label". On the time line there are frame names such as "stand", "walk", "block", "duck", "punch_01",...ect. Those are the movement the character will perform when we tell it to.


Figure 8.3
 
At the bottom is a layer called "animation". This layer contains all graphics for the movement of the red pants dude. Above this "animation" layer, there is a layer called "command". This layer is very important. For each movement, the action script in this layer will be different. For example, let's take a look at "stand" frame label. The action script at frame 1 of layer "command" is as the following;

Line  1 ../:man_invincible = "off";
Line  2 ../:man_noturningback = "off";
Line  3../:man_hurt = "off";
Line  4../:warp = "off";
Line  5../:walking = "on";
Line  6../:duck = "on";
Line  7../:block = "on";
Line  8../:kick_01 = "on";
Line  9../:kick_02 = "on";
Line10../:kick_03 = "off";
Line11 ../:kick_04 = "off";
Line12 ../:punch_01 = "on";
Line13 ../:punch_02 = "on";
Line14 ../:punch_03 = "off";
Line15 ../:punch_04 = "off";
Line16 ../:movement = "on";
Line17 ../:punch_link_03 = "off";
Line18 ../:kick_link_03 = "off";
Line19 ../:kick_link_04 = "off";
Line20 if (../:status == "death") {
Line21     gotoAndPlay("death");
Line22 } else if (../:status == "walk") {
Line23     gotoAndPlay("walk");
Line24 } else if (../:status == "hurt_01") {
Line25     gotoAndPlay("hurt_01");
Line26 } else if (../:status == "hurt_02") {
Line27     gotoAndPlay("hurt_02");
Line28 } else if (../:status == "punch_01") {
Line29     gotoAndPlay("punch_01");
Line30 } else if (../:status == "kick_01") {
Line31     gotoAndPlay("kick_01");
Line32 } else if (../:status == "duck") {
Line33     gotoAndPlay("duck");
Line34 } else if (../:status == "block") {
Line35     gotoAndPlay("block");
Line36 } else if (../:status == "stand") {
Line37     play();
Line38 }
(See Figure 8.4)

Figure 8.4

I will explain it line by line just to let you see the idea of each parameter used.

Line 1: ../:man_invincible = "off"; 

There is going to be a time that your character is untouchable, during special move, during rolling on the floor, during lying down on the floor, during death(?),... etc. So I use this value to declare invincibility of the main character. When setting it off, the main character can be hit and hurt. When setting it on, he is untouchable.

Line 2: ../:man_noturningback = "off";
This value is very cool! I used it to make my character face to the direction he's supposed to face. Basically, the main character facing the way he is moving. When the main character executes combos(chain of attack movements), he will keep going the way he is facing which doesn't make sense. Then I have the "../:man_noturningback" value set, the main character can turn back and face at the enemy to attack automatically. This value is set to make the main character smarter. :)

Line 3: ../:man_hurt = "off";
This value is to show that the main character is being hurt or not. Basically, if he is hurt(../:man_hurt = "on"), I will set the condition to prohibit him to move.

Line 4: ../:warp = "off";
There is a frame label I call "warp" somewhere on the timeline. This "warp" movement is the rolling movement of my main character. I set this value to be "off" just to prevent him to do the rolling move at this state. Meaning, I don't allow him to roll when he is standing. (He can roll when he is ducking.)

Line 5: ../:walking = "on";
This value is to indicate the permission for my main character to walk from this state("stand"). "On" means he can walk from this state.

Line 6 - 19: 
The same as line 5. Those values are for the permission of each movement I set for. You can see that some of them are "on" but some are "off". The ones that say "on" mean it is ok to make that move from this "stand" state. On the other hand, "off" means not allow.

Line 20: if (../:status == "death") {
Line 21:    gotoAndPlay("death");
There is a value called status that I set just to show what status of main character is. These two lines show that if the status = "death", go to and play "death" frame label.

Line 22 - 37:
They are the same as line 20 and 21. If the value of "status" equals what it indicates, go to the frame label correspondingly.

Easy isn't it? Let's take a look at frame 2 at the "command" layer as seen in Figure 8.5.

Figure 8.5
 
The action script you see in the figure is as the following;

../:walking = "on";
../:duck = "on";
../:block = "on";
../:kick_01 = "on";
../:punch_01 = "on";
if (../:status == "death") {
    gotoAndPlay("death");
} else if (../:status == "walk") {
    gotoAndPlay("walk");
} else if (../:status == "hurt_01") {
    gotoAndPlay("hurt_01");
} else if (../:status == "hurt_02") {
    gotoAndPlay("hurt_02");
} else if (../:status == "stand") {
    gotoAndPlay(1);
}

Basically they look the same as in frame 1. I think you get the hang of it on how to set the parameters for the beginning of how to test your character.


Testing your character movement (Part 1)

September 8, 2011
___________________________________________________________________

Here comes the part you are to control your character. After you have done creating your main character movement, the layout on the main time line would look like in Figure 7.1.
   
Figure 7.1

In this part, I don't put my preloader in there since it is not needed now. If we take a look at frame 1, we can see that there is an action script written in layer "Man". The action script at this frame will be the initial state of your parameters.(see Figure 7.2)
      
Figure 7.2
    
Don't worry about those parameters shown in the Figure, I will just guide you the needed parameters we are to use next.
  
Figure 7.3
 
In Figure 7.3, you can see that I put frame labels "gameon" and "over" on frame 5 and 16, respectively, on layer "command". At "gameon" frame label, we will start game at this frame until frame 15(you can see the action script at frame 15 which I will explain later) and it will loop back to frame "gameon" over and over. We won't actually need frame label "over" right now but I will explain it here anyway. Later on, you will have your character life bar which refers to your character life. When it reaches zero, your character die. Yeah, the game will have to jump to "over" frame name and will be playing until frame 20(you can see the action script at frame 20) and it will loop back to frame "over" again and again.

Characters (Part 3)

September 7, 2011
___________________________________________________________________

I made my main character in Muay Thai 2 by drawing a picture and using F8 to convert it to a movie clip.
   
Figure 6.1

You don't have to paint it. Just keep drawing the outline. This way will keep your Flash file small and it won't take long time when you test your Flash game. I named my main character as "man" as you see in Figure 6.1.

Now we have to get inside this Movie clip by double clicking it.

You can see in Figure 6.2 below how I laid out the actions and labels of my main character.
 

Figure 6.2

In the layer "label", I put frame label names corresponding to my main character actions in layer "animation". For example, in frame label "stand", I have 4 graphics and each graphic takes 2 frames duration. Take a look at "walk" frame label. I also have 4 graphics and each of them takes up only one frame duration.


Figure 6.3

There will be more than 2 layers later on but right now I am going to focus on how to construct your character first.

I will talk about other layers(especially "coding and action script") in other topics which is not hard.

Now, I hope you get a picture how to create your character roughly. You could fill in colors for your character just to see how it will look like. For me? I filled colors in when I was sure that the game worked since along the way, you will have to always test your movie and it takes time to compile if you have a colorful flash file. So, just keep it in mind then that to paint it last ;)


Figure 6.4: The special move from Muay Thai 2

Some moves do not require many graphics as you think. Take a look at the animation above, Figure 6.4, the special move. It looks like you have to draw a lot of pictures but if you look more closely at graphic 3 to 6, they are just the same picture. You can reuse some pictures for other actions of your character as well ;)


(Note: I like this background color, a bit green and yellow. Since this color was hardly used for my character, it is a good way for checking which part your don't paint yet. If you use white as background, you might miss painting some white spot on your character.)


Characters (Part 2)

September 5, 2011
___________________________________________________________________

When you design a character in fighting game type, you need to know what action your character would perform. Make a list of moves you want him/her to do. For example, my Muay Thai 1, the main guy(red pants), I listed his moves below.

- Standing
- Walking
- Guarding
- Crouching
- Rolling foreward
- Rolling backward
- Punching step 1
- Punching step 2
- Punching step 3
- Punching step 4
- Kicking step 1
- Kicking step 2
- Kicking step 3
- Kicking step 4
- Special move 1
- Special move 2
- Getting hit 1
- Getting hit2
- Getting juggling
- Getting up
- Dying

Gee! That's a lot, huh? Well, you could do more or less than my list :) Anyway, after you got your list, just draw them out frame by frame. Here are some of my character movements.


Figure 5.1: Guarding

  
Figure 5.2: Crouching (crappy)


Figure 5.3: Punching step 1(still crappy >_<'')


Figure 5.4: Punching step 2

   
Let's take a look at Figure 5.4. When you make the frame by frame animation in Macromedia Flash, you might want to turn on the "Onion Skin" or "Onion Skin Outlines" as seen below.

Figure 5.5

When you click at the "Onion Skin", it will show the markers which you can adjust the width of it by dragging the bracket at the right or left side of the bracket.(see Figure 5.6)

Figure 5.6
   
You can see that it will show the faded image you drew around the onion markers. Then you can animate frame by frame better. For the "Onion Skin Outlines", it will be just the outline of the graphic(s) in the boundary of the onion markers as show below.

Figure 5.7

Try it! You can do it. Good luck ;)


Characters (Part 1)

September 2, 2011
______________________________________________________________________

This is a 2-Dimensional game(2D game). So, most of characters in this game I drew them myself. If you are not good at drawing and painting. You probably look for free sprites from anywhere you can get from the internet. If you draw something in Flash, the graphic will be vector. If you use sprites from somewhere else, the graphic will be bitmap.

Figure 4.1 Drawn in Flash
  
Vector graphics comprise mathematical representations of lines, fills, colors, and gradients, whereas bitmap graphics are a pixel-by-pixel representation of the color, and optionally, alpha channel information in a visual element.

The greatest advantage that vectors have over bitmaps is that they can be scaled (both up and down) and translated without losing any fidelity. After all, you're only performing basic addition, multiplication and matrix operations on mathematical formulae. Flash is regularly spoken of as a "vector animation tool" although it can (and does) handle bitmaps really well too.
 
Bitmaps, on the other hand, also have several advantages over vectors. Vectors, especially complex ones, can be both larger in filesize (and thus bandwidth requirements) and slower in performance than the same visual element rendered as a bitmap.

Anyway I prefer drawing my character in Flash. Here are all my characters for Muay Thai 1.(see Figure 4.2)
Figure 4.2: Characters from Muay Thai 1
  
Some of these characters don’t have names. My main guy is with the red pants. His name is “Goh”. Hahahah,  you should know the guys from Street Fighter. They look pretty crappy. I did not put a lot of time drawing them back then. Figure 4.3 shows all my characters from Muay Thai 2.
Figure 4.3: Characters from Muay Thai 2
  
Let’s talk about how to design your main character. First thing to think about is the basic movement which could be standing, walking, crouching, guarding, etc. Then we will go to attack movement, i.e. punches, kicks, special moves, etc.
___________________________________________________________________
  
-Standing-
  
If you just put only one graphic for a standing pose for your character, he would be really bored(if he could feel anything). In Muay Thai 1, I did put only one graphic because I am too lazy :p And yes, my red pants guy told me he doesn’t like it.(see Figure 4.4).
Figure 4.4
  
So, in Muay Thai 2 I do loop to my main character as seen in Figure 4.5 below. This makes my character more interesting even though he is just standing ;)

Figure 4.5

I drew only 3 pictures to run standing loop. As you can see above, the 2nd picture and the 4th picture are the same picture.
 
___________________________________________________________________

-Walking-

The same thing goes for walking here. As we can see from Figure 4.6 below, there are 4 states of walking animation(I drew all 4 states).


Figure 4.6: from Muay Thai 1

Let's take a look at walking animation from Muay Thai 2 in Figure 4.7.


Figure 4.7: from Muay Thai 2

Only 4 pictures would be just fine to animate walking motion.

___________________________________________________________________


Parameters

September 1, 2011
________________________________________________________________________

Games that show scores, number of lives left, items you collect, status, stats, etc... all of these games need parameters to be set up.

In Flash, it's very important to set parameters that you are using in your game at the beginning. As we can see in Figure 3.1, I just set my parameters in the second frame.

Clipboard01


 Figure 3.1
 
As you can see there are a lot of parameters in Actions panel. At the beginning of my game making, I don’t have this many parameters. It was just added up along the way when I keep making my game until it is done. For example, if you look at the Actions panel, line 1, you will see…
   
set_enemy = 3;
 
“set_enemy” is a parameter that I made it up.
“3” is what I set up for number of enemy in the game.
    
Another example we can look at is at line 24 and 25.
 
bg_x = 275;
bg_y = 190;
 
“bg_x” is a parameter that I will use for one of my backgrounds in x position.
“bg_y” is a parameter that I will use for one of my backgrounds in y position.
      
OK. That’s the basic to set  your parameters at the beginning of the game. Now, let’s take a look at how we use it when we make a game. Figure 3.2 shows the background that I used in Stage 1 for Muay Thai 1. If I click at my background to select it, you can see the script on the Actions panel as the following.
      
Line 1:  onClipEvent (enterFrame) {                      
Line 2:          this._x = /:bg_x;
Line 3:          this._y = /:bg_y;
Line 4:          if (/:bg_x <= -275) {
Line 5:              /:bg_x = 825;
Line 6:          } else if (/:bg_x > 825) {
Line 7:              /:bg_x = -265;
Line 8:          }
Line 9:  }


(My background is a movie clip behavior. There are 3 types of behavior in Flash, movie clip, button, and graphic)
    
Figure 3.2
    
Let’s see what is going on on the script line by line.
   
Line 1, the “enterFrame” tells you that when the game runs through here, this script activates.
  
Line 2, “this._x” is the x position of my background (since I am selecting my background, I can use “this._x” where “this” refers to the thing that I select). I set it to the parameter of “bg_x”. Remember this “bg_x” we talked earlier above? (bg_x = 275; in Figure 3.2)
Do you see that I use “/:bg_x” instead of “bg_x” alone? It’s because whenever you refer to a parameter that you set value at the beginning, you have to put “ /: ” before the name of the parameter. Or you can use _root.bg_x instead.
   
Line 3, the same thing but for y position of my background.
   
Line 4 – 9 are just trying to make the background in boundary since this background will move according to the movement of the main character which I will talk about it later.
  
OK. I will show you how to refer your parameters. Look at Figure 3.3, you can see that I set x = 2, y =3, and z = 4 in the first frame at Scene 1.
  
Clipboard06
Figure 3.3: I create a blue circle using “Oval Tool” and then I press F8,
name it as circle 1st level(movie clip type)
  
If I say,
 
m = x;
n = y;
p = z;
   
Here, I will get 
  
m = 2
n = 3
p = 4
  
The blue circle is my movie clip named “circle 1st level”. Double clicking  this blue circle will bring us inside its movie clip as seen in Figure 3.4.
   
Clipboard07
Figure 3.4
  
In here, I set x = 20, y = 30, and z = 40 at the beginning of frame 1.
If I say

m = x;
n = y;
p = z;

I will get
  
m = 20
n = 30
p = 40

But if I say
  
m = ../:x;
n = ../:y;
p = ../:z;

I will also get
   
m = 2
n = 3
p = 4

One more time, if I say
  
m = /:x;
n = /:y;
p = /:z;
  
I will also get
  
m = 2
n = 3
p = 4

Now I select my blue circle again and press F8 to name it as “circle 2nd level”(movie clip type). Then I double click on this blue circle to get inside it again as seen in Figure 3.5.
  

Clipboard08
Figure 3.5
  
In here, I set parameters x = 200, y = 300, and z = 400 at the first frame as seen in the Figure.
If I say
  
m = x;
n = y;
p = z;

I will get
  
m = 200
n = 300
p = 400

But if I say
  
m = ../:x;
n = ../:y;
p = ../:z;

I will also get
  
m = 20
n = 30
p = 40

One more time, if I say
 
m = ../../:x;
n = ../../:y;
p = ../../:z;
  
I will  get
  
m = 2
n = 3
p = 4

And here, if I say this
  
m = /:x;
n = /:y;
p = /:z;
  
I will also get
  
m = 2
n = 3
p = 4
  
For those of you who want to really see how to check for m, n, and p I was talking about, you can do as the followings.
First go deep inside your blue circle at “Circle 2nd level”.(see Figure 3.6)
  
Clipboard20 Figure 3.6
  
Use the Text tool as shown in Figure 3.7 below.
  
Clipboard09 
Figure 3.7
  
Place your text like so. But hold on! Before you put any word in the text box, look at the properties tab down below(or press Ctrl + F3).(see Figure 3.8)
  
Clipboard10 Figure 3.8
  
You will see a dropdown menu for text type. Change it to “Static Text” as in Figure 3.9.
  
Clipboard11 Figure 3.9
  
Now, type in your text
  
m =
n =
p =
  
(see Figure 3.10)
  
Clipboard12
Figure 3.10
   
Next you will put the other kind of text called “Dynamic Text” next to m, n, and z. Use the Text tool again and place it as in Figure 3.11.
  
Clipboard13
Figure 3.11
  
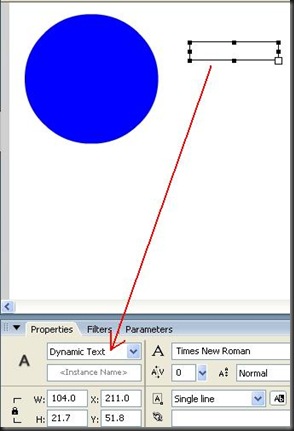
Change the text type to “Dynamic Text” as shown in Figure 3.12 below.
  
Clipboard14Figure 3.12 
  
Type “00” in your text box(Note: you can actually type anything in there, try it!) as seen in Figure 3.13.
  
Clipboard15 
Figure 3.13
  
If you look inside the properties tab, you can see the box labeled “Var:”. This is where you put your parameter in. For this case, you can put “x” in there as in Figure 3.14.
   
Clipboard16 
Figure 3.14
  
Do the same thing to n, and p. (see Figure 3.15)
  
Clipboard17
Figure 3.15 
  
And put Var: as y, and z, repectively for n and p. Now test your file by pressing Ctrl + Enter or go to Control –> Test Movie (see Figure 3.16)
   
Clipboard18 Figure 3.16
  
You will see your movie showing up as in Figure 3.17.
  
Clipboard19 
Figure 3.17
  
This is how you check values of your parameters. Keep it in mind that you have to put a parameter in “Var:” box to see the value you are checking for. In this case you can put

x or /:x or../:x or ../../:x

in the “Var:” box for m and see what will happen.
 
(Note: You can set all parameter to be global(set parameters at scene 1) and use _global.x or _root.x to refer to the global parameters.)

Try it and see it on your own. I hope you get some idea about setting parameters.